Pages

Follow Me on Pinterest

Saturday, November 24, 2012

Caps to chill with~

 Having more fun with the Eddie Cap tutorial (here)

I had a request for an Oliver Twist type material in
this cap...
so i went to my local D.A.V. and found a great tweed
suit coat for $4.50   :)
and it had no center back seam, so it was perfect to
cut up and re purpose!
I had a very nice navy blue lining too, so i just cut
all my pieces with the existing lining.
for the band piece, i used the bottom hem of the coat...
it even already had interfacing in it. :)
i made this for an adult guy, so I had to enlarge the patten.

fyi-i used a 14x14" square. and adjusted the angles
around the hexagon to measure 6" each side.
my band finished size was 23" so with ease and seams,
it was cut at 25".
i did cut the bill the same size as the original.
let me just say, this was fast.
easy. and rewarding.
i will add pictures of the cap with the actual recipient
when i have them to add, but since i just sent them off,
i just posted these for now.

i highly recommend this tutorial.
:)

twin polka dots for fall

sometimes the fabric just tells you what to make out of it.
when i saw this material i knew it was for Alyvia and Jude.
fun velvety polka dots on a golden satiny fabric. wow.
and i loved the bordeaux color with it... adding a richness
and depth.
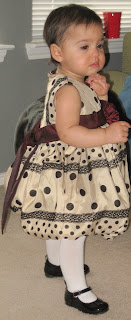
so i made a cute bubble dress mixing a party dress pattern
with a tutorial i found here for making a bubble skirt to guide me along.
since Alyvia and Jude are twins and are now walking everywhere,
i wanted these outfits to not only co-ordinate but also to be easy for them to wear -
forgiving, but very special. i cut the fabric for Jude's VEST (tutorial here), so that i had
just the polka dots that i wanted without the feminine look of the lacy
motif that was also on the fabric.
I love double top stitching on a vest to add to the professional look.
I used "heirloom" buttons from my Yiayia's old sewing caddy.
this is something that i love to do as a very personal thoughtful touch
in this impersonal cookie cutter world, to put a little piece of me
in clothes for the babies in particular.
of course, once i had bothered to cut the fabric so that the dots


continued their pattern across the chest, i had to sew the button
holes in where the buttons would BE the dots. :)
had to.
this vest is reversible as i cut the lining fabric for lining the entire
thing, not just the sides.
i also made matching binky clips for them to use.
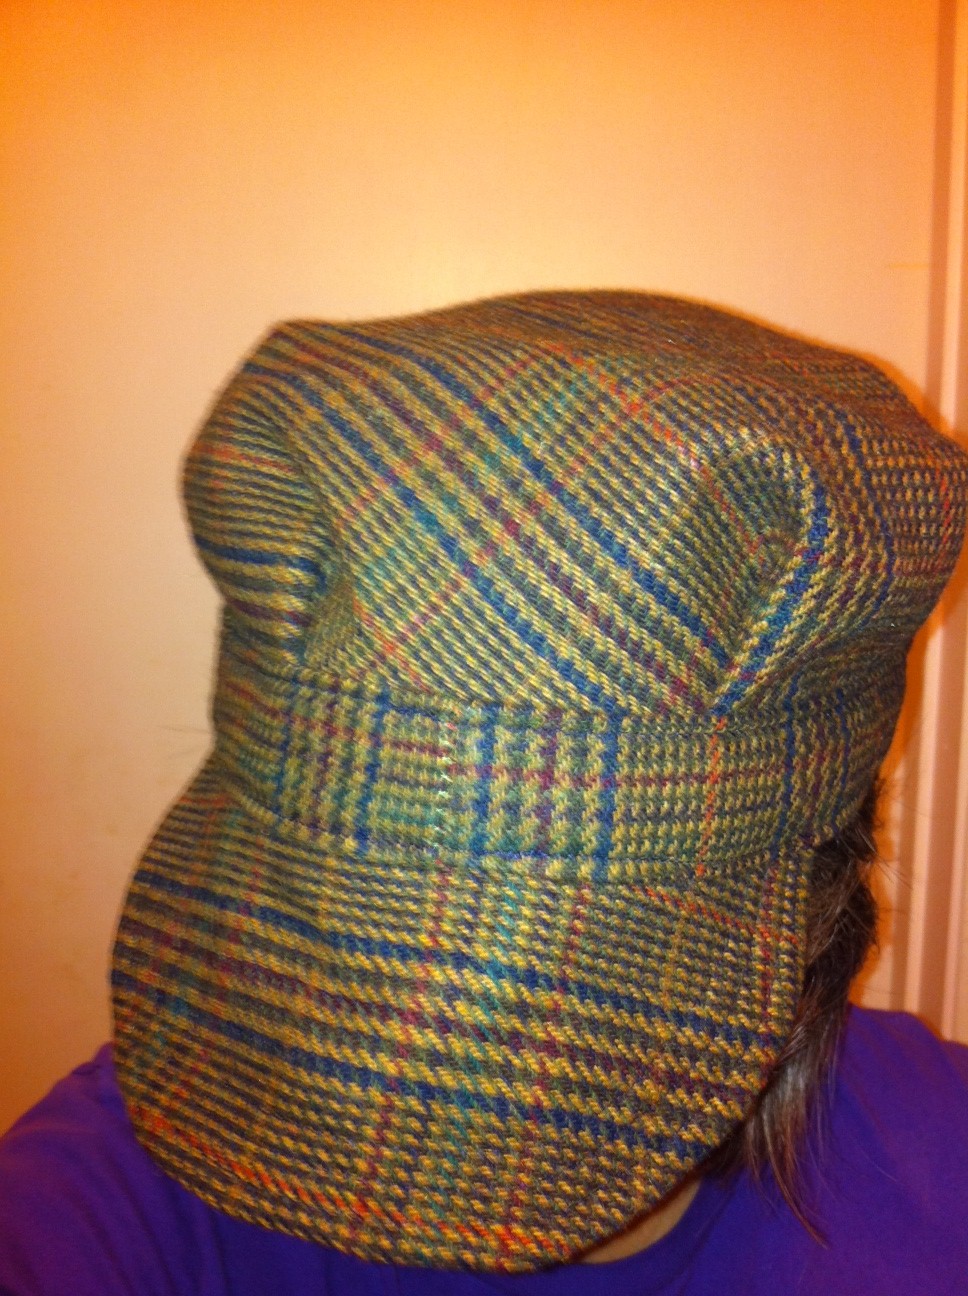
and since Alyvia's dress ended up so vavavavoom, i thought Jude would
want a little something more than a vest from Aunt Karen, so I made
this fabulous hat!!! the Eddie Cap tutorial i found here
(more hats from this pattern to follow.:)
again, i used heirloom vintage fabric from Yiayia. This yummy green velvet.
:) hard to sew through so many layers. but worth it.
the color choice was inspired by Jude's eyes. :)
they were so cute Thanksgiving day wearing their new outfits!


Cuff crazy

so I went boot cuff crazy for a while, and have made several different variations,
These might be my favorite yet: a nice oatmeal blend with a wooden button.
I made the pattern up as I went:
with K hook:
chain 20
hdc in each chain turning each row,
for as many rows as you need for the leg measurement.
These are 25 rows.
join with slip stitches.
make 3 rows of hdc around one edge, working in tops
of rows. tie off
on other end, make 1 row of sc all around working in tops
of rows
wih G hook:
chain 6, make a ribbed band around with hdc in back loops only,
turning after each row.and d2gether into the rounds at the edge of cuff.
when you get to the beginning do not join, but continue on 5 rows to make a tab.
fasten off.
attach button on tab by sewing it on.

Photos courtesy of Michele Dan
I made another version of this with thick two strand yarn, and did not make a ribbed top but just a sc a band around top and bottom,
1 row each.
attach a button. :)
easy-peasy.
Don't they look great on Michele!?
Very photogenic. :) Thanks, Michele for sending me
pics! you two look great!

Michele Dan shows off her fun cuffs with hubby, Cary.


Wednesday, October 31, 2012

boot toppers with left-overs

completed cuff. I stopped at 35 rows
instead of 43 on the pattern.
so i am making boot toppers for some friends and myself. and as usual, i found several patterns 
that i liked and as i began to crochet, i totally changed it at will.
the proBLem iS that i have to remember to keep track of my (genius) changes as i go, and let's just say, stopping to log your brilliance really puts a damper on said brilliance...so.
i keep a notepad up on my lap top as i go, making it easy for me to one handed jot down what row i am on,
and even better, to make mess free edits on the page the NEXT time that i change it.
which always happens.
as for row counters. who has them just laying around unless you already had them laying around...
so i use a bobby pin or a twisty tie. fyi.


boot cuffs/boot toppers keep your ankles from looking larer than life (no one needs that!)
as a long sock would. So avid all that bulk and whip up some cuffs!
use any stitch that you know how to do! the options and variations are plentiful.
i plan to make some double or triple scalloped edge ones too in a regular wt. yarn so it won't get too bulky. here is your jumping off point:


you can fold them over boot top
Pattern links I began with:
Basic boot cuff pattern
http://thebungalowboutique.com/2011/12/23/need-a-last-minute-diy-gift-30-minute-boot-cuffs/
they are the "same" but oddly look radically different...

muff side folded down
hmmm. note to self: yarn work is all about individual tension and interpretation of instructions. :)

or flip them with ribbed side up for a
more subdued look
i think boot toppers are a great way to use up the scraps of yarn from other projects!
who will care!
i don't see any reason why these cuffs can't be two or four in one:
wear them ribbed side up, or muff side up.
or fold them over boot tops ribs up or down!


Hancock's fabrics are having a yarn sale beginning this week, so no mental leap to imagine where i will be going soon!


A place for friends and peeps to click coffee cups over crafts of anykind!

This blog with swish and swirl with all things that interest me~ or most things anyway. No pressure, no particular plan. (shockiNg!)
but i want the option to gather my favorite and interesting items!
:) njoy!